This post is a collaboration between AWS, NVIDIA and Heidi.
Automatic speech recognition (ASR), often called speech-to-text (STT) is becoming increasingly critical across industries like healthcare, customer service, and media production. While pre-trained models offer strong capabilities for general speech, fine-tuning for specific domains and use cases can enhance accuracy and performance.
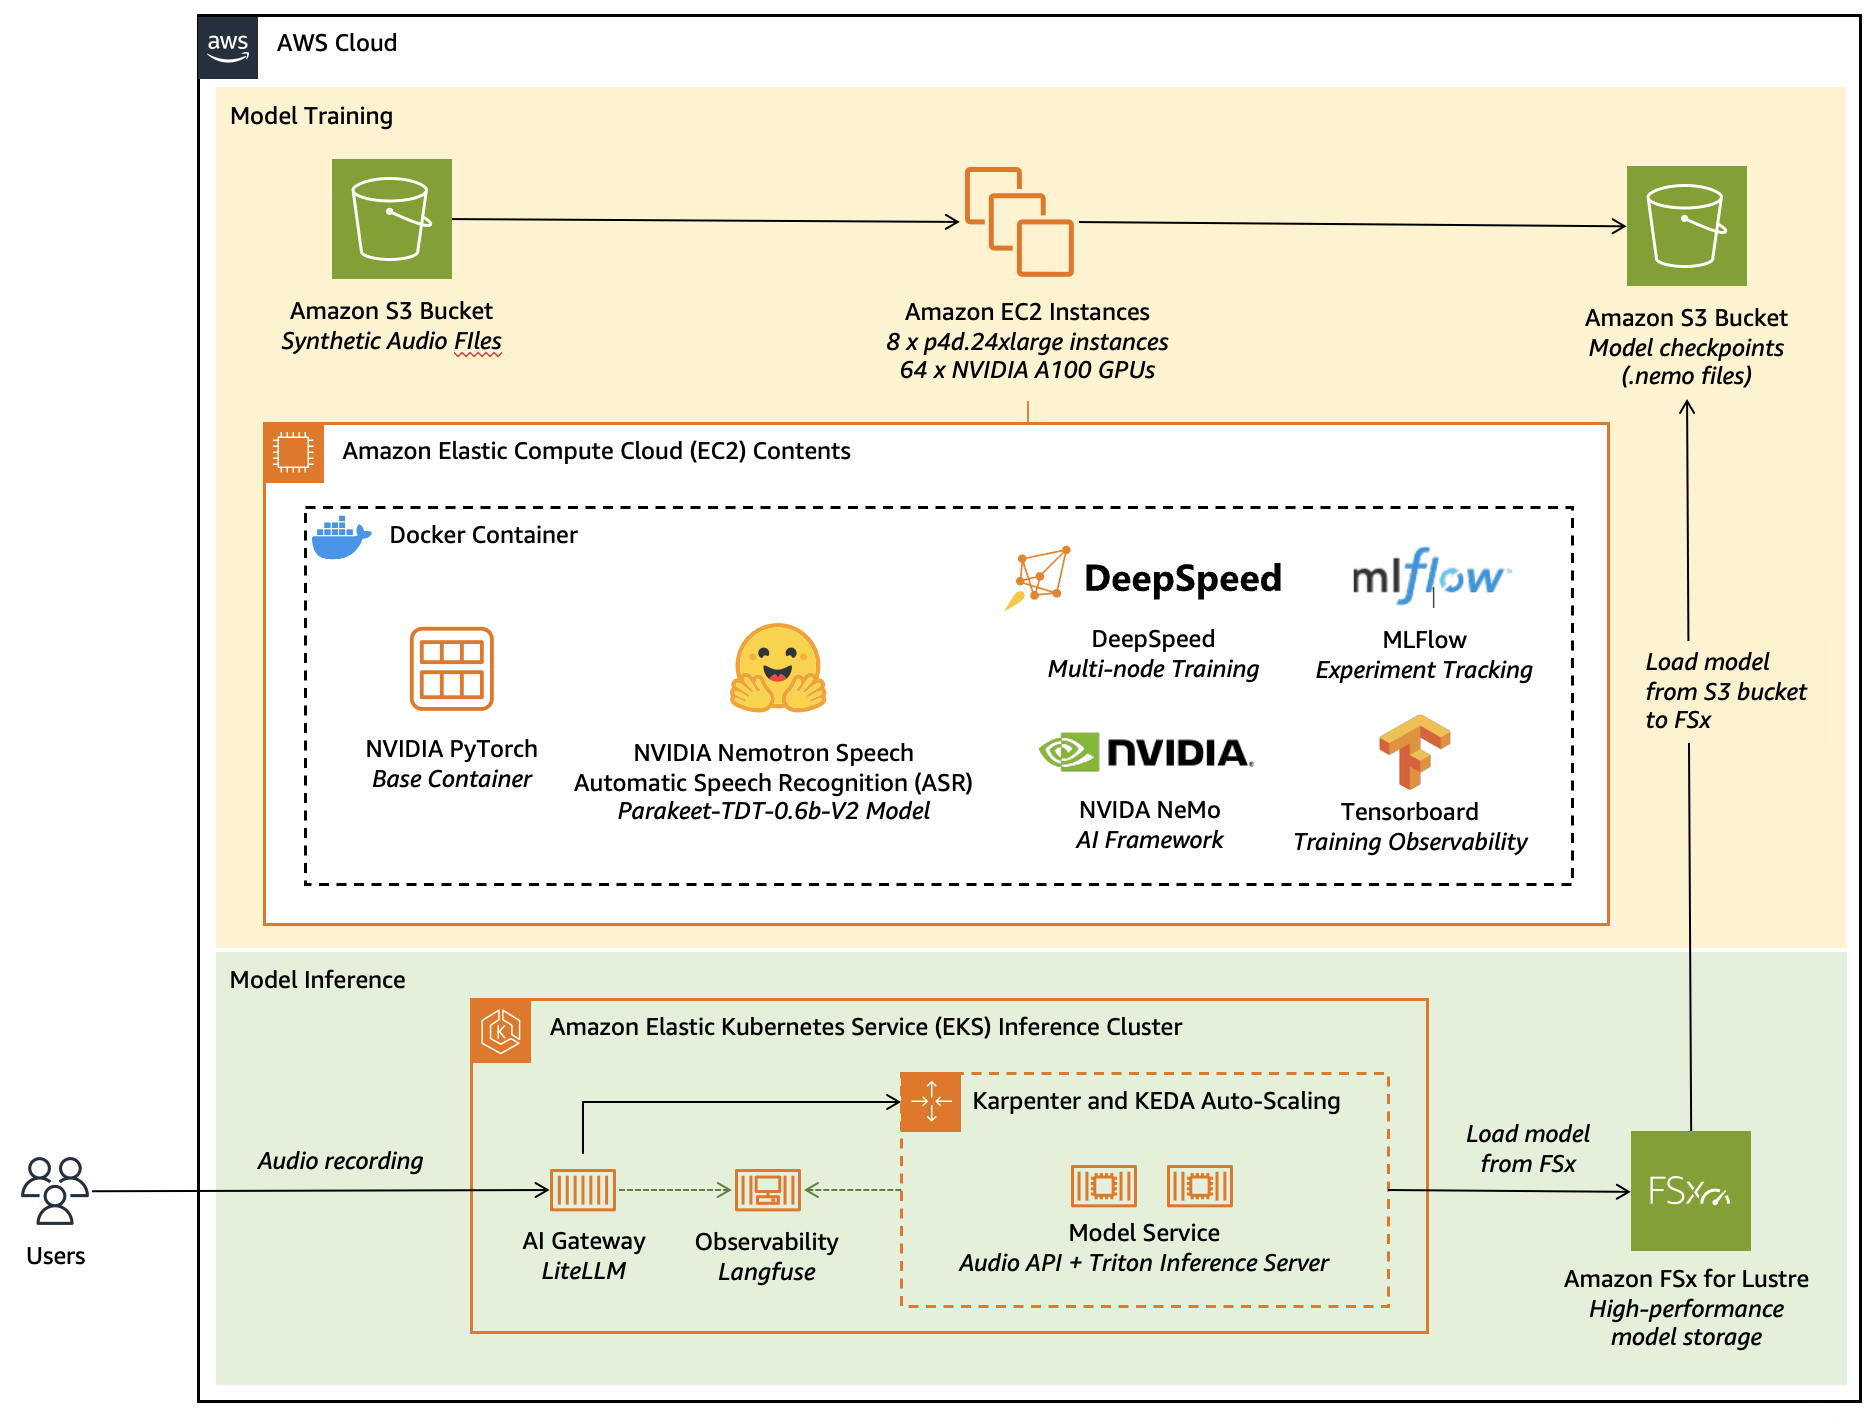
In this post, we explore how to fine-tune a leaderboard-topping, NVIDIA Nemotron Speech Automatic Speech Recognition (ASR) model; Parakeet TDT 0.6B V2. Using synthetic speech data to achieve superior transcription results for specialised applications, we’ll walk through an end-to-end workflow that combines AWS infrastructure with the following popular open-source frameworks:
- Amazon Elastic Compute Cloud (Amazon EC2) GPU instances (p4d.24xlarge with NVIDIA A100 GPUs) for distributed training at scale
- NVIDIA NeMo framework for ASR model fine-tuning and optimization
- DeepSpeed for memory-efficient distributed training across multiple nodes
- MLflow and TensorBoard for comprehensive experiment tracking
- Amazon Elastic Kubernetes Services (Amazon EKS) for scalable model serving
- Amazon FSx for Lustre for high-performance model weight storage
- AI Gateway and Langfuse for production-grade API management and observability
- Docker for consistent, reproducible environments across training and inference
This architecture demonstrates how to use the managed services of AWS alongside best-in-class open-source AI tools to build production-ready, domain-adapted ASR systems that deliver measurable business value—from initial fine-tuning through to elastic, observable deployment.
Solution Overview: Heidi’s AI Care Partner
Heidi is an AI Care Partner that removes the work around care—handling documentation, clinical evidence, and patient communications so clinicians can stay focused on patients. The platform supports over 2.4 million consultations per week in 110 languages across 190 countries. Used across emergency departments, general practice, and specialist clinics, Heidi helps clinicians reclaim hours each day while maintaining the accuracy and integrity of the clinical record.
Out-of-the-box ASR models struggle with medical terminology, regional accents, and code-switching between clinical and conversational language. These limitations lead to transcription errors, lost context, and increased cognitive load which forces clinicians to spend time correcting what should have saved them time. For clinicians, accurate documentation isn’t just convenience. It’s clinical safety, liability protection, and trust in the tool. A note with errors undermines all three.
To address this, Heidi collaborated with AWS Generative AI Innovation Center (GenAIIC) to fine-tune and adapt the model to the unique linguistic, acoustic, and contextual nuances of real-world clinical environments—enabling accurate and reliable performance at scale. Using recent advancements in text-to-speech (TTS) models, Heidi generated high-quality, multilingual synthetic speech interleaved with real-world noises from conversations emulated with large language models (LLMs). This approach allowed the team to scale training across a wide range of accents, and medical contexts without compromising patient privacy. Using synthetic data also enabled targeted augmentation with focus on low-resource languages and rare medical terms that are underrepresented in open datasets.
Fine-tuning was conducted using Amazon EC2 GPU instances optimized for deep learning workloads. By usings pre-configured AWS Deep Learning AMIs, the team was able to accelerate experimentation and model iteration while maintaining control over performance and security. The combination of scalable compute and tightly integrated AWS services enabled fast, cost-effective development within a highly regulated environment.

Figure 1: This figure shows the diagram for fine-tuning and deploying NVIDIA Parakeet TDT 0.6B V2 model on AWS services.
Synthesizing domain-specific data
To help improve NVIDIA Parakeet TDT 0.6B V2‘s performance on medically specialized terminology, we developed a targeted synthetic data generation pipeline combining large language models (LLMs), neural text-to-speech (TTS) synthesis, and noise augmentation. The process began by compiling a lexicon of medical terms, primarily drug names, anatomical entities, and procedural phrases that exhibited low recall in prior evaluation runs. These terms were used as conditioning inputs for a domain-adapted LLM, which generated semantically coherent and contextually diverse transcripts resembling real-world clinical dictations. The prompts were designed to elicit varied linguistic structures and natural code-switching patterns that are frequently observed in medical speech. For example, intermixing abbreviations, Latin-origin words, and colloquial phrasing.
The generated transcripts were later transformed into speech using a neural TTS system, configured for specific accents and natural prosody. To increase data diversity and realism, we employed a multi-stage audio augmentation pipeline. This involved overlaying hospital and clinic ambient noise recordings such as background conversations, machine alarms, and hospital ambient noises sampled from open acoustic datasets. We also applied controlled perturbations, including random gain adjustments, reverberation filters, and additive Gaussian noise to simulate real-world microphone and environment conditions. Each synthetic utterance was assigned a randomized signal-to-noise ratio (SNR) between 10–25 dB to balance clarity and authenticity.
Introduction to NVIDIA Parakeet TDT 0.6B V2 model
The NVIDIA Parakeet TDT 0.6B V2 is a 600-million parameter automatic speech recognition (ASR) model designed for high-quality English transcription. Built on NVIDIA NeMo’s FastConformer architecture with a Token-and-Duration Transducer (TDT) decoder, this model helps provide exceptional speech recognition capabilities along with valuable features like:
- Automatic punctuation and capitalization
- Word-level timestamp predictions
- Robust performance on spoken numbers and song lyrics
- Support for audio segments up to 24 minutes in a single pass
The open model achieves an impressive 6.05% average Word Error Rate (WER) across various benchmark datasets on the Hugging Face Open-ASR Leaderboard, demonstrating its effectiveness for general English speech recognition.
Why fine-tune the model?
Despite its strong out-of-the-box performance, fine-tuning the NVIDIA Parakeet TDT 0.6B V2 model for specific domains offers several compelling advantages:
- Domain-specific terminology – Enhanced recognition of specialized vocabulary and jargon that can be rare in general training datasets
- Accent and dialect adaptation – Improved performance for specific regional speech patterns or linguistic variations
- Noise resilience – Better handling of domain-specific background noises and acoustic environments
- Cost efficiency – Reduced need for expensive third-party API calls with your own optimized model
- Customized optimization – Balance between accuracy and inference speed tailored to your specific application requirements
Model architecture
The NVIDIA Parakeet TDT 0.6B V2 model uses a Token-and-Duration Transducer (TDT) architecture with these key components:
Encoder architecture
The encoder transforms input audio features into contextual representations through multiple processing stages:
- Conformer Encoder: 24 conformer layers with 1024 hidden dimensions
- Convolutional Subsampling: Initial feature extraction with four convolutional layers
- 3×3 convolutions with stride 2 for progressive downsampling
- Channel dimension of 256 throughout the convolutional stack
- Positional Encoding: Relative positional encoding with dropout (0.1)
Conformer layers
Each conformer layer includes:
- Feed Forward Modules: Two FFN blocks with 4096 inner dimension
- Convolutional Module: 9×1 depthwise convolution with causal padding, batch normalization, and Swish activation
- Multi-Head Attention: Self-attention mechanism with relative positional encoding
- Normalization: Layer normalization between components
- Dropout: 0.1 dropout rate for regularization
Decoder & Joint Network
The decoder and joint network combine encoder outputs with predicted tokens to generate final transcriptions:
RNN Decoder:
- Embedding layer (1025 vocabulary size, 640 embedding dimension)
- 2-layer LSTM with 640 hidden units and 0.2 dropout
Joint Network:
- Linear transformations for encoder and decoder
- ReLU activation with 0.2 dropout
- Output projection to 1030 dimensions
Audio processing and loss function
The model employs specialized preprocessing and training objectives to help optimize transcription accuracy:
- Mel Spectrogram Preprocessing: Converts raw audio to mel-scale spectrograms
- Spectral Augmentation: Time and frequency masking to help enhance robustness
- TDT Loss: Token-and-Duration Transducer loss for simultaneous prediction of tokens and their durations
- Word Error Rate (WER): Primary evaluation metric for transcription quality
Setting up your environment for fine-tuning
Our fine-tuning approach leverages distributed training on Amazon EC2 instances, with a path to deployment on Amazon SageMaker AI. The environment is encapsulated in a Docker container to facilitate consistency and reproducibility.
Docker-based environment setup
The Docker container includes the necessary dependencies for fine-tuning as shown in the following code snippet. You can access the complete file in the associated GitHub repository here:
FROM nvcr.io/nvidia/pytorch:24.01-py3

ENV DEBIAN_FRONTEND=noninteractive
ENV TZ=UTC

# Set the working directory
WORKDIR /app

# Install system dependencies
RUN apt-get update && apt-get install -y
    libsox-fmt-mp3
    gnupg
    && rm -rf /var/lib/apt/lists/*

# Install Cython (needed for NeMo)
RUN pip install Cython

# Clone the specified branch of the pytorch-lightning repository and install it
RUN git clone -b bug_fix https://github.com/athitten/pytorch-lightning.git &&
    cd pytorch-lightning &&
    PACKAGE_NAME=pytorch pip install -e .

# Install TransformerEngine for optimization
RUN git clone https://github.com/NVIDIA/TransformerEngine.git &&
    cd TransformerEngine &&
    git fetch origin 8c9abbb80dba196f086b8b602a7cf1bce0040a6a &&
    git checkout FETCH_HEAD &&
    git submodule init && git submodule update &&
This container provides:
- NVIDIA’s optimized PyTorch container as the base
- NeMo framework for ASR model handling
- DeepSpeed for efficient distributed training
- MLflow and TensorBoard for experiment tracking
Resource requirements
For efficient fine-tuning, we recommend:
- EC2 instance type: p4d.24xlarge (8 NVIDIA A100 GPUs per instance) – The A100 GPUs provide 80GB of high-bandwidth memory per GPU, essential for handling the Parakeet TDT 0.6B V2 model’s 600 million parameters with large batch sizes. A100 tensor cores accelerate mixed-precision training, reducing training time compared to previous-generation GPUs. Note that there are newer, more powerful EC2 instances such as P5 that are also available to cater for more demanding requirements.
- Cluster size: 8 nodes (64 GPUs total) for full-scale training – Distributed training across multiple nodes enables larger batch sizes and faster convergence through parallelization, supporting efficient training on large-scale audio datasets. With 64 GPUs, you can train on extensive datasets (100+ hours of audio) in hours rather than days, enabling rapid experimentation for production timelines.
- Storage: At least 500 GB per node for model checkpoints and data. This capacity accommodates frequent checkpoint saving, intermediate training states, and local caching of preprocessed audio features. Adequate storage prevents I/O bottlenecks that could idle expensive GPU resources during training.
For smaller datasets or budget constraints, the training can scale down to fewer nodes or GPU instances like g6e.2xlarge.
Data preparation for fine-tuning
The Parakeet TDT 0.6B V2 model requires audio data and corresponding transcriptions in NeMo’s JSONL manifest format. Each line in these files points to the synthesized audio and the corresponding transcript that it was synthesized from.
{   "audio_filepath": "/path/to/audio.wav", "duration": 5.2,
    "text": "The transcription with punctuation and capitalization."
}
Creating training manifests
Our fine-tuning approach uses three separate manifest files:
- Training manifest: Contains the bulk of your data for model training
- Validation manifest: Used to evaluate model performance during training
- Test manifest: Used for final evaluation of the fine-tuned model
The dataset should ideally include diverse speakers, accents, and acoustic conditions relevant to your domain for improved performance.
Fine-Tuning configuration deep dive
Our fine-tuning configuration is comprehensive and carefully tailored for the Parakeet TDT 0.6B V2 model:
Model configuration
The configuration specifies the Parakeet TDT 0.6B V2 architecture with 17 conformer blocks:
model:
  sample_rate: 16000
  normalize_text: true
  symbols_to_keep: ["'"]

  encoder:
    _target_: nemo.collections.asr.modules.ConformerEncoder
    feat_in: ${model.preprocessor.features}
    n_layers: 17
    d_model: 512
    subsampling: dw_striding
    subsampling_factor: 8
    subsampling_conv_channels: 256
Token-and-Duration Transducer (TDT) settings
The TDT architecture is configured with specific duration values to predict token emission timing:
model:
  model_defaults:
    tdt_durations: [0, 1, 2, 3, 4]
    num_tdt_durations: 5

  loss:
    loss_name: "tdt"
    tdt_kwargs:
      durations: ${model.max_duration}
      sigma: 0.02
      omega: 0.1
Audio preprocessing
Audio preprocessing is configured for optimal feature extraction:
preprocessor:
  _target_: nemo.collections.asr.modules.AudioToMelSpectrogramPreprocessor
  sample_rate: ${model.sample_rate}
  normalize: "per_feature"
  window_size: 0.025
  window_stride: 0.01
  features: 128
  n_fft: 512
  dither: 0.00001
Data augmentation
To help improve model robustness, multiple augmentation techniques such as Spectrogram augmentation are applied:
train_ds:
  augmentor:
    speed:
      prob: 0.4
      min_speed_rate: 0.9
      max_speed_rate: 1.1

spec_augment:
  _target_: nemo.collections.asr.modules.SpectrogramAugmentation
  freq_masks: 2
  time_masks: 10
  freq_width: 27
  time_width: 0.05
Additional augmentation strategies like noise augmentation and shift perturbation are available as commented options in the configuration file.
Distributed training strategy
The training is configured for efficient distribution across multiple GPUs and nodes:
trainer:
  devices: 8
  num_nodes: 8
  strategy:
    _target_: "lightning.pytorch.strategies.DeepSpeedStrategy"
    stage: 2
    offload_optimizer: true
    partition_activations: true
    gradient_as_bucket_view: true
    cpu_checkpointing: true
    contiguous_gradients: true
    overlap_comm: true
This DeepSpeed configuration improves memory usage and communication between GPUs for maximum training efficiency.
Implementing the fine-tuning process
Our implementation uses a modular approach with a dedicated ASRTrainer class:
Model initialization and unfreezing
def get_base_model(self, trainer):
    """Get the base model to start training from based on config settings."""
    pretrained_name = self.config.init_from_pretrained_model

    # Handle multi-GPU download efficiently
    num_ranks = trainer.num_devices * trainer.num_nodes
    if num_ranks > 1 and is_global_rank_zero():
        logging.info(f"Downloading pretrained model '{pretrained_name}' on main process")
        asr_model = ASRModel.from_pretrained(model_name=pretrained_name)
    else:
        # Wait for model download to complete on main process
        wait_time = 1 if is_global_rank_zero() else 60
        logging.info(f"Waiting {wait_time}s for model download")
        time.sleep(wait_time)
        asr_model = ASRModel.from_pretrained(model_name=pretrained_name)

    asr_model.to(f"cuda:{int(os.environ.get('LOCAL_RANK', 0))}")

    # Unfreezing encoders to update the parameters
    asr_model.encoder.unfreeze()
    logging.info("Model encoder has been un-frozen")

    return asr_model
This approach provides efficient model loading in a distributed training environment, with only the main process downloading the model and other processes waiting to avoid redundant downloads.
Training execution
def train(self, model_path):
    """Train the ASR model."""
    # Create trainer with experiment manager for logging
    trainer = self.create_trainer()

    # Initialize model based on config settings
    asr_model = self.get_base_model(trainer)

    # Setup dataloaders
    asr_model = self.setup_dataloaders(asr_model)

    # Setup optimization
    asr_model.setup_optimization(self.config.model.optim)

    # Setup SpecAug if available
    if hasattr(self.config.model, 'spec_augment'):
        asr_model.spec_augment = ASRModel.from_config_dict(self.config.model.spec_augment)

    # Train the model
    trainer.fit(asr_model)

    # Save the trained model
    asr_model.save_to(model_path)

    return model_path
This training function:
- Creates a PyTorch Lightning trainer with appropriate logging
- Loads and prepares the pre-trained model
- Sets up data loaders for training, validation, and testing
- Configures optimization parameters and data augmentation
- Executes the training process
- Saves the final model
- Records training and evaluation artifacts in MLflow
Performance monitoring and optimization
Monitoring training progress is essential for making sure that the model is learning effectively:
Experiment tracking with MLflow
MLflow provides comprehensive tracking of:
- Training and validation loss curves
- WER progression
- Model checkpoints for best-performing iterations
- Performance across different datasets and conditions
exp_manager:
  create_mlflow_logger: true
  mlflow_logger_kwargs: {"tracking_uri": "mlruns"}
  checkpoint_callback_params:
    monitor: "val_wer"
    mode: "min"
    save_top_k: 10
This configuration saves the 10 top-performing model checkpoints based on validation WER.
Memory optimization with DeepSpeed
DeepSpeed’s memory optimization techniques enable training of large models on limited hardware:
- Stage 2 optimization: Optimizer states are offloaded to the CPU
- Gradient accumulation: Enables effective larger batch sizes
- Memory-efficient attention: Reduces memory requirements for attention computation
- Gradient checkpointing: Trades computation for reduced memory usage
trainer:
  devices: 8  # Number of GPUs to use (-1 would use all available)
  num_nodes: 8  # Number of compute nodes (servers) for distributed training
  max_epochs: 2  # Maximum number of training epochs
  max_steps: -1  # Maximum number of training steps (-1 means compute from epochs)
  val_check_interval: 1.0  # Validation frequency: 1.0 = once per epoch, 0.25 = 4 times per epoch
  accelerator: auto  # Hardware accelerator: auto, gpu, cpu
  strategy:
    _target_: "lightning.pytorch.strategies.DeepSpeedStrategy" # "lightning.pytorch.strategies.DeepSpeedStrategy" or "lightning.pytorch.strategies.DDPStrategy"  # Distributed training strategy
    stage: 2
    offload_optimizer: true  # Offload optimizer states to CPU to save GPU memory
    offload_parameters: false  # Don't offload model parameters to CPU
    partition_activations: true  # Partition activations across GPUs to save memory
    gradient_as_bucket_view: true  # Use bucket view for gradients to save memory
    cpu_checkpointing: true  # Store activations on CPU during backward pass
    contiguous_gradients: true  # Ensure contiguous memory for gradients
    overlap_comm: true  # Overlap communication and computation
    allgather_bucket_size: 2e8  # Bucket size for all-gather operations
    reduce_bucket_size: 2e8  # Bucket size for reduce operations
    zero_force_ds_cpu_optimizer: false  # Don't force CPU optimizer with ZeRO
After optimization and fine tuning the model, let’s see how we can deploy this model for efficient inferencing.
Model inference
Adopting the right tools for deploying models can make or break our service. Imagine the utility of our model, if it is too slow or too expensive to run, this makes its ROI unattractive for the business. We must consider model latency, cost, security, observability and elasticity for our model to be useful.
The deployment, therefore, would be a combination of our fine-tuned model, the right hardware and an elastic system that can scale up and down quickly. Let’s see how AWS helps us build for each of these dimensions.
Model packaging
The first thing to consider is how the users will access our model. By building on standard APIs, we can use the already existing security and observability components for our model. OpenAI REST APIs have emerged as a standard when it comes to serving modern models. For our use case, OpenAI audio transcription API provides the right fit.
We do use Torch as an inferencing engine; however, we have written an overlay that allows us to expose our model as an OpenAI API. You can access this file in the associated repository here:
app = FastAPI(
    title="Optimized NeMo ASR OpenAI-Compatible API")

@app.post("/v1/audio/transcriptions")
async def create_transcription(
    background_tasks: BackgroundTasks,
    file: UploadFile = File(..., description="Audio file to transcribe"),
    model: Optional[str] = "nemo-parakeet-rnnt-1.1b",
    language: Optional[str] = "en",
    prompt: Optional[str] = None,
    response_format: Optional[str] = "json",
    temperature: Optional[float] = 0.0,
    timestamp_granularities: Optional[List[str]] = None
):
Next is to package our model, its dependencies and the overlay code in a consistent and portable way. A portable package also enables the capability to scale to new machines with ease in response to increasing user workload. We recommend containers for these requirements.
We start with a trusted base image (Amazon Linux 2023) and then install the Python runtime environment. We then install the FFMpeg library which you might need to preprocess the audio (such as change bit rate of audio signal). Then, we install the required FastAPI libraries to expose the audio API and the nemo-toolkit library to load and serve the model.
You can find this file in the associated repository here:
FROM amazonlinux:2023

# Install Python and essential tools
RUN dnf update -y &&
    dnf install -y shadow-utils python3.11 python3.11-pip python3.11-devel gcc gcc-c++ wget tar gzip xz &&
    dnf clean all &&
    ln -sf /usr/bin/python3.11 /usr/bin/python &&
    ln -sf /usr/bin/pip3.11 /usr/bin/pip

    # Install ffmpeg from static build (recommended for AL2023)
RUN wget -q https://johnvansickle.com/ffmpeg/releases/ffmpeg-release-amd64-static.tar.xz &&
    tar -xf ffmpeg-release-amd64-static.tar.xz &&
    mv ffmpeg-*-amd64-static/ffmpeg /usr/local/bin/ &&
    mv ffmpeg-*-amd64-static/ffprobe /usr/local/bin/ &&
    rm -rf ffmpeg-* &&
    chmod +x /usr/local/bin/ffmpeg /usr/local/bin/ffprobe

# Some parts od Dockerfile is skipped in here. Refer to repo for a full file

RUN pip install --no-cache-dir --upgrade pip &&
    pip install --no-cache-dir fastapi uvicorn python-multipart soundfile uvloop prometheus-fastapi-instrumentator

RUN pip install -v --no-cache-dir nemo_toolkit[asr] torch cuda-python>=12.3
You might have noticed that we have not packaged the model into this container. We want to load models at runtime for deployment agility and to reduce maintenance of our Docker container. Let’s see how Amazon Elastic Kubernetes Service (Amazon EKS) brings it altogether for our container.
Model service
Amazon EKS is a managed Kubernetes service that’s used to run containers at scale. EKS provides deep integrations with other AWS services for compute including GPU, storage, and networking, and provides efficient scaling of resources to run our workload elastically.
The container that we built in the last section has our overlay code and required libraries to serve the model. Let’s add the required hardware and software to our container to start serving.
Firstly, the model itself will be injected at runtime into the container. This approach helps reduce the overall initialization time because Amazon FSx for Lustre provides low-latency storage that connects to our container. With Amazon EKS, we can provision this with the Amazon FSx CSI EKS add-on. We define a StorageClass to connect to the FSx drive and then define a PersistentVolumeClaim as shown in the below code snippet:
---
apiVersion: storage.k8s.io/v1
kind: StorageClass
metadata:
  name: fsx-lustre-dynamic
provisioner: fsx.csi.aws.com
parameters:
  # Required parameters for dynamic provisioning
  subnetId: subnet-06cec24e5bcb56f31
  securityGroupIds: sg-0a36ac0d3bdb52e8d

  # FSx Lustre configuration
  deploymentType: PERSISTENT_2  # Options: SCRATCH_1, SCRATCH_2, PERSISTENT_1, PERSISTENT_2
  storageType: SSD  # Options: SSD, HDD (HDD only available with PERSISTENT_1)
  perUnitStorageThroughput: "1000"

  automaticBackupRetentionDays: "1"
allowVolumeExpansion: true
volumeBindingMode: Immediate
reclaimPolicy: Retain  # Options: Delete, Retain
mountOptions:
  - flock
  - _netdev
---
apiVersion: v1
kind: PersistentVolumeClaim
metadata:
  name: lustre-models-pvc
  namespace: lws-demo
spec:
  accessModes:
    - ReadWriteMany
  resources:
    requests:
      storage: 2400Gi  # Minimum size for FSx Lustre is 1.2 TiB
  storageClassName: fsx-lustre-dynamic
Next, we deploy the container to Amazon EKS. EKS manages the underlying infrastructure so you can focus on model development and inference. EKS provides resilient GPU‑enabled nodes and support for high‑performance shared filesystems optimized for loading model weights. To use GPUs in EKS clusters, we are using Karpenter for node auto-scaling, which will automatically provision and scale GPU nodes based on pods requesting them. The NVIDIA AMIs that are optimized for EKS include the host-level requirements for using NVIDIA GPUs in Kubernetes clusters. You can install the NVIDIA device plugin to expose GPUs to workloads.
This infrastructure is provisioned declaratively through the following deployment.yaml which is available in the associated repository here. Notice the tolerations section through which workloads can run on nodes that have the corresponding taints. Also, notice the required GPUs by the model is defined declaratively under the resources section. Karpenter will automatically provision the right node to satisfy the criteria mentioned in the resource section:
apiVersion: apps/v1
kind: Deployment
metadata:
  name: nemo-parakeet
  labels:
    app: nemo-parakeet
spec:
  replicas: 1
  selector:
    matchLabels:
      app: nemo-parakeet
  template:
    metadata:
      labels:
        app: nemo-parakeet
    spec:
      tolerations:
        - key: "model-inferencing"
          operator: "Equal"
          value: "gpu-general"
          effect: "NoSchedule"
      volumes:
      - name: lustre-models
        persistentVolumeClaim:
          claimName: lustre-models-pvc
      containers:
      - name: nemo-parakeet
        image: container.registry/nemo-parakeet:0.1
        resources:
          limits:
            cpu: "8"
            memory: 32Gi
            nvidia.com/gpu: "1"
          requests:
            cpu: "8"
            memory: 32Gi
            nvidia.com/gpu: "1"
From here, we will auto scale our pods based on a custom criterion, which is average processing seconds per call in our case, as shown, in the below code snippet. Karpenter allows for node auto-scaling based on CPU and memory, but KEDA can be used for pod scaling based on custom metrics, as you can see in the following configuration.
---
apiVersion: keda.sh/v1alpha1
kind: ScaledObject
metadata:
  name: nemo-parakeet-keda-scaler
  namespace: lws-demo # Make sure this is the same namespace as your nemo-parakeet deployment
spec:
  scaleTargetRef:
    apiVersion: apps/v1
    kind: Deployment
    name: nemo-parakeet
  minReplicaCount: 1
  maxReplicaCount: 5 # Adjust the max number of replicas as needed
  pollingInterval: 5 # How often KEDA will check the metric (in seconds)
  cooldownPeriod: 120 # The period to wait after the last trigger before scaling down
  triggers:
    - type: prometheus
      metadata:
        # This should be the address of your Prometheus server.
        # This is a common address for Prometheus installed via the kube-prometheus-stack.
        serverAddress: http://prometheus-operated.monitoring.svc.cluster.local:9090
        query: |
            avg(max_over_time(nemo_asr_request_latency_seconds_avg[10m]))
        threshold: "1"
        ignoreNullValues: "true"
After the model has been exposed as a standard API, we use the existing open-source tooling for security and observability.
Exposing the model
Open-source technologies generally attract large, active communities that contribute to ongoing innovation and security updates. Adopting open-source technologies allows flexibility in selecting and adapting infrastructure and helps us to support evolving requirements, especially in the rapidly changing landscape of modern machine learning (ML) systems.
We start with the AI Gateway. An AI gateway’s job is to streamline the process for your teams to build AI applications while it provides consistent governance and security and improved agility for your AI teams. AI gateway provides an ML oriented API gateway that can semantically understand the details of a request to better support load balancing, security, observability and failover. Hosting our AI gateway onto EKS will provide a consistent system for the model and the gateway resulting in reduced operational complexity and latency.
The second component for a production grade model serving is observability. As with the other components, we deployed Langfuse onto EKS. Langfuse integrates with AI Gateway with the configuration in the following code snippet. You can see the file in the platform components repository here.
      forward_to_langfuse: True
      success_callback: ["langfuse"]
      failure_callback: ["langfuse"]
      langfuse_public_key: os.environ/LANGFUSE_PUBLIC_KEY
      langfuse_secret: os.environ/LANGFUSE_SECRET_KEY
      langfuse_host: os.environ/LANGFUSE_HOST
You can see the full call log into Langfuse as shown in the following image. You can see it captures the input, the generated output and relative metrics such as time to first token (TTFT) and latency.

You can access the relative manifest for AI Gateway, Karpenter and Observability on EKS in the GitHub repository.
The big picture
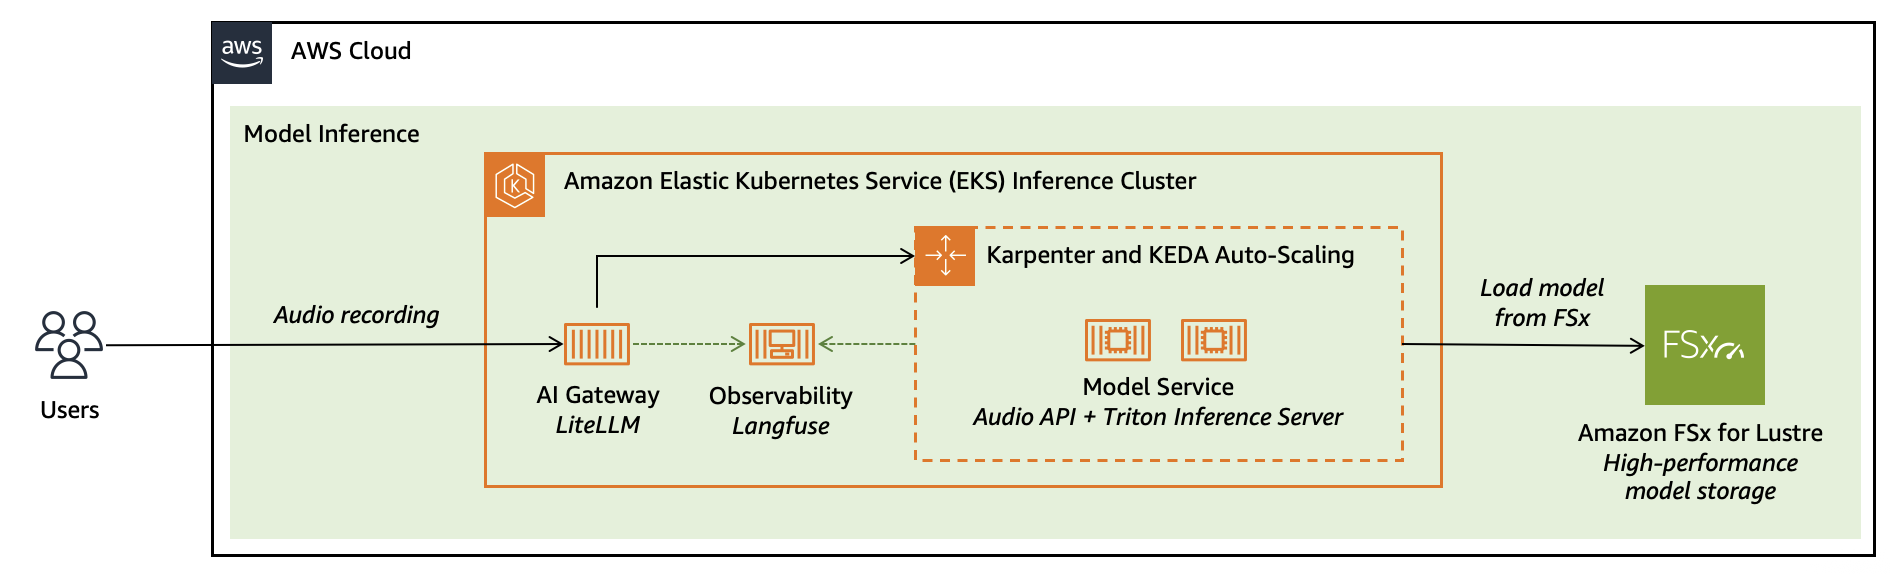
Our goal is to run the model in a production-grade, self-hosted environment while continuing to use open-source technologies. These technologies provide the flexibility to evolve our implementation without disrupting integration across different parts of the production system. Currently, we use OpenAI-compatible APIs for model serving, NVIDIA Triton for inference optimization, Langfuse for observability and Kubernetes (through Amazon EKS) APIs for resource management and scaling.
The following image shows that the AI Gateway provides security and routing, while observability traces every request end-to-end — from the AI Gateway, to the EKS infrastructure, and the model itself.
Conclusion and next steps
In this post, we’ve demonstrated how AWS helps provide a complete, production-ready solution for fine-tuning and deploying custom ASR models. From distributed training on Amazon EC2 with GPU instances, to scalable inference on Amazon EKS, you can now build domain-specific speech recognition systems that deliver real business impact.
If you prefer a fully managed service without managing infrastructure, consider exploring Amazon SageMaker AI for hosting NVIDIA Nemotron Speech NIM. This provides an alternative deployment approach with built-in scalability and management capabilities.
To help you get started, we have provided comprehensive code samples and configuration files throughout this post. You can find the complete training and deployment code in our GitHub repository, including:
- Docker configurations for training and inference environments
- Fine-tuning scripts with a distributed training setup
- Kubernetes manifests for EKS deployment
- AI Gateway and observability integration examples
We encourage you to experiment with these resources and adapt them to your specific use case. Whether you’re working with medical terminology, financial services jargon, or industry-specific language, this architecture helps provide the foundation for achieving improved transcription accuracy. If you would like additional support, contact your AWS account team to explore an engagement with AWS Generative AI Innovation Center (GAIIC). Happy building!
Acknowledgement
Special thanks to Prem Oommen, Xuetong Wu, Simon Zhao, Taha Ansari, Vlad Gavrilov, Yi Han, Ocha Chakramurti, James Dinh, Daniel Wirjo, Sheldon Liu and Rosanna Bianchi for their contribution.
About the authors
 Faisal Masood is a Container Specialist at AWS where he assists customers in evolutionary architectures, containers, software development, and Inferencing. Faisal has over two decades of experience in software architecture and development. Faisal has completed his engineering studies at NED University and has completed continuing education courses at MIT Sloan and the University of New Mexico. Faisal published three books on MLOps and Kubernetes, built multiple Cloud and Kubernetes courses at 10Pearls University and has spoken at local and international conferences.
 Iman Abbasnejad is an Applied Scientist at the Generative AI Innovation Center at Amazon Web Services (AWS). He collaborates closely with AWS customers to design, develop, and deploy cutting-edge generative AI models and solutions. His work focuses on bridging the gap between theoretical AI research and practical, real-world applications, helping organizations accelerate their adoption of generative AI technologies.
 Nicola Smyth is a Solutions Architect at Amazon Web Services (AWS). With a background in backend development and healthcare, she works closely with startups to design and implement scalable cloud solutions that drive innovation and growth. Nicola specialises in partnering with health tech startups, helping them build and scale their solutions on AWS.
 Tim Ma is a Senior Developer Relations Manager at NVIDIA, where he collaborates with the ecosystem to design and deploy cutting-edge machine learning solutions. He also leads go-to-market strategies for generative AI solutions, helping organizations harness the potential of advanced AI technologies
 Curt Lockhart is an AI Solutions Architect at NVIDIA, where he helps customers deploy language and vision models to build end to end AI workflows using NVIDIA’s tooling on AWS. He enjoys making complex AI feel approachable and spending his time exploring the art, music, and outdoors of the Pacific Northwest.
 Francesco Ciannella is a senior engineer at NVIDIA, where he works on conversational AI solutions built around large language models (LLMs) and audio language models (ALMs). He holds a M.S. in engineering of telecommunications from the University of Rome “La Sapienza” and an M.S. in language technologies from the School of Computer Science at Carnegie Mellon University.
In this post, we explore how to fine-tune a leaderboard-topping, NVIDIA Nemotron Speech Automatic Speech Recognition (ASR) model; Parakeet TDT 0.6B V2. Using synthetic speech data to achieve superior transcription results for specialised applications, we’ll walk through an end-to-end workflow that combines AWS infrastructure with the following popular open-source frameworks. Read More